SAML 2.0
Diagram
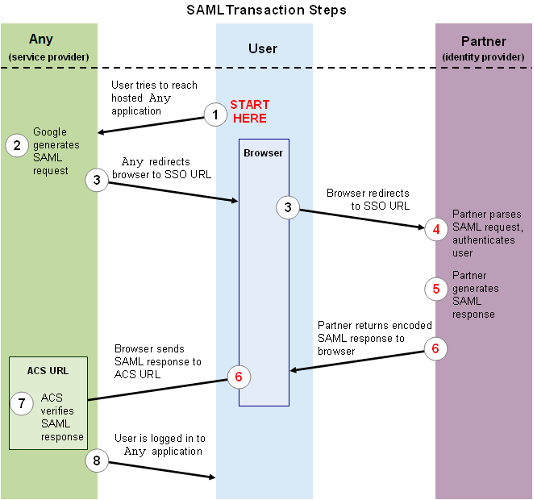
Introduction
Before configuring SAML, you must have a user created with the same sign-in identifier as the one of your domain. If you want to test the configuration from your laptop, make sure your account has already been created. If you have no matching user, you will no longer be able to sign in to Any. When you reach Any, you are signed in with your local account. Once signed in, if you want to use another account, just sign out, then sign in with another account from the sign-in page.
Configuration
Any ships with a preconfigured SAML configuration file named "shiro-saml.ini". To use it, just rename it to "shiro.ini".
Below is the part to change in the "shiro.ini" file to configure your SAML connection. The entityID can be anything you want, as long as it identifies your environment. For instance: Ged-Any
# Pour l'authentification unique du navigateur Web, la liaison de redirection HTTP
et la liaison HTTP POST sont couramment utilisées.
# urn:oasis:names:tc:SAML:2.0:bindings:HTTP-POST
ou urn:oasis:names:tc:SAML:2.0:bindings:HTTP-Redirect
saml2Config.destinationBindingType = urn:oasis:names:tc:SAML:2.0:bindings:HTTP-POST
# Préfixe par « classpath: » si les fichiers sont dans « web-inf/classes »,
ne mettez rien au même endroit que « shiro.ini »
saml2Config.keystorePath = samlKeystore.jks
saml2Config.keystorePassword = mot_de_passe_keystore
saml2Config.privateKeyPassword = mot_de-passe_clé_privée
saml2Config.identityProviderMetadataPath = idp-metadata.xml
saml2Config.maximumAuthenticationLifetime = 3600
saml2Config.serviceProviderEntityId = entityID
saml2Config.serviceProviderMetadataPath = sp-metadata.xml
saml2Config.logoutDisabled = true

clients.callbackUrl = <url de any>/callback
"logoutDisabled" set to true prevents a user signed in through CAS from signing out to sign back in with another login.
In this example, the protocol is not required because the files are not inside "WEB-INF/classes". If your configuration files sit in "WEB-INF/classes", you must add the protocol before the file name, for instance classpath:samlKeystore.jks In that case, you must add the protocol for the following properties:
saml2Config.keystorePath = classpath:samlKeystore.jks
saml2Config.identityProviderMetadataPath = classpath:idp-metadata.xml
saml2Config.serviceProviderMetadataPath = classpath:sp-metadata.xml
Keystore configuration
SAML requires a keystore file to sign and encrypt every transaction. If you do not have one already, the command below generates one:
keytool -genkeypair -alias c6-any -keypass <private-key-password> -keystore  samlKeystore.jks
-storepass <keystore-password> -keyalg RSA -keysize 2048 -validity 3650
With self-signed certificates, the <private-key-password> and <keystore-password> passwords must be the same.
Once you have your keystore file, update the path and the passwords in "shiro.ini", shown in bold below.
saml2Config.keystorePath = samlKeystore.jks
saml2Config.keystorePassword = <keystore-password>
saml2Config.privateKeyPassword = <private-key-password>
To encrypt your password, see section 5.2 of the installation guide.
Identity provider metadata file
The identity provider metadata file is generated and supplied by your SAML service. It carries information about your SAML system, such as the entityID, the cryptographic keys and the protocol endpoints. Just update the path to your file:
saml2Config.identityProviderMetadataPath = idp-metadata.xml
Callback URL
Update "shiro.ini" with the URL of your server.
clients.callbackUrl = <url de any>/callback
Automatic generation of the service provider metadata file
By default, the sp-metadata is generated automatically. If the file is not generated correctly, you can do it by hand (see the next chapter). You must update the path to the metadata file of your service provider and the entityID. The file is created the first time the server starts.
saml2Config.serviceProviderEntityId = entityID
saml2Config.serviceProviderMetadataPath = sp-metadata.xml
Start your server and open Any in a browser.
The "sp-metadata.xml" file is generated. Send that file and the identifier to be registered on the SAML server.
Manual configuration of the service provider metadata file
If sp-metadata.xml is not generated automatically, you can configure it yourself by adapting the supplied sp-metadata-template.xml. To adapt the template, follow the steps below:
- Rename sp-metadata-template.xml to sp-metadata.xml
- Export your certificate from the keystore with the following command
keytool -exportcert -alias c6-any -keystore samlKeystore.jks -file crt.pem -rfc
- Copy the content of crt.pem without the first line "-----BEGIN CERTIFICATE-----" and the last line "-----END CERTIFICATE-----", and replace
<!--COPY CERTIFICAT-->twice in your sp-metadata.xml. - Replace [Your entityID] in the first line entityID="[Your entityID]" with the same value set in shiro.ini earlier.
- Adapt the location twice with the host name and the port of your server.
Location=https://[hostname]:[port]/any/callback?client_name=SAML2Client
Once your sp-metadata is generated, restart your Tomcat to load the new configuration.