DocuSign
DocuSign is an electronic signature solution. This integration sends Any contents for signature through DocuSign. The configuration requires creating an application on the DocuSign side to obtain the credentials used by Any.
Signature on iOS: on iOS mobile and tablet, the DocuSign signature does not work under Safari, only under Chrome.
DocuSign - Apps and Keys
To be able to use DocuSign from Any, you must generate a token that is then used in the Any configuration.
Sign in to your DocuSign account and go to Settings, then to the Apps and Keys section.
Store your User ID as it is asked for later. Click the Add App and Integration Key button.
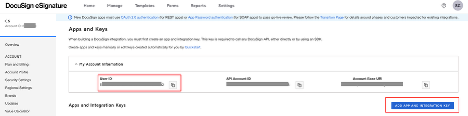
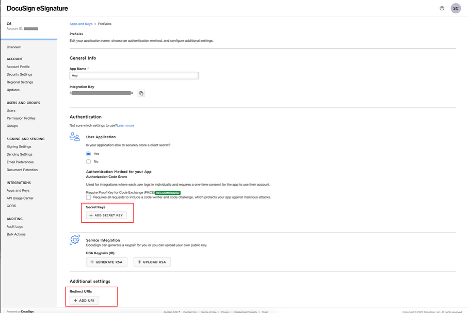
Create a new application, fill in the name (for instance Any) and store the Integration Key as you will use it later.
Click Add Secret Key and store it.
Finally, add the company website (for instance https://www.c6.eu) in the Redirect URIs field and save.
DocuSign - Token
To be able to connect your Any instance, you must create a token. This token is made of your Integration Key and your Secret Key separated by ':' and encoded in Base 64.
To generate the token, go to https://www.base64encode.org and type the following text using the values retrieved in the previous chapter:
<Integration Key>:<Secret Key>
You should therefore get a value like this:
8xxxxxxxxxxxxxxxxxxxxxxx0:2xxxxxxxxxxxxxxxxx1
Encode the value.
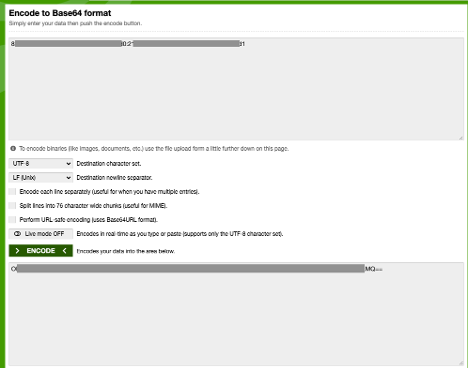
The generated encoded value is used as the token in the configuration. It must end with ==, for instance:
ODIxXXXXXXTcxOS00NzA0LTgyY2IXXXXXXXXTExNGZkXXXXXXXIxYmMwMjM5LTY0YjEtNGFjMC05YjcxLTMwODZlODFmMXXXXXQ==
Store the token as it is used in the next chapters.
DocuSign – Access authorization
To be able to sign the contents with DocuSign, you must also authorize the remote access to your DocuSign account.
To do so, you must call a URL built like this:
https://account.docusign.com/oauth/auth?response_type=code&scope=signature%20impersonation&client_id=<Integration Key>&redirect_uri=<redirect_url>
with <Integration Key> to be replaced with the Integration Key and <redirect_url> to be the redirect URL used in chapter 2, encoded as a URL parameter.
The URL should look like this:
https://account-d.docusign.com/oauth/auth?response_type=code&scope=signature%20impersonation&client_id=8xxxxxxxxxxxxxxxxxxxxxxxxxxx0&redirect_uri=https%3A%2F%2Fwww.c6.eu
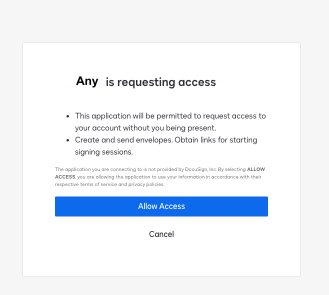
Calling the URL should show this page. Click the Allow Access button.
DocuSign - Connect
When a document is signed in DocuSign, the signed content must be returned to Any using a return URL.
This is configured in the Connect part of the Settings of your DocuSign account.
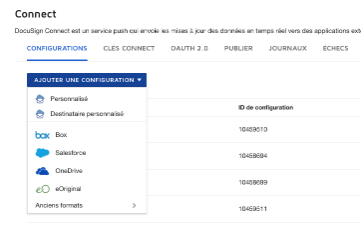
In this section, create a new configuration by clicking Add Configuration and select Custom.
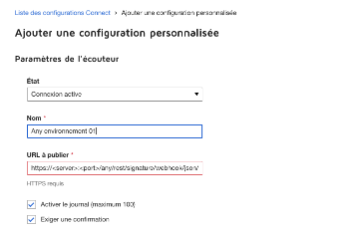
Leave the status on Active connection, set a name (for instance Any Environment 01).
In the URL to Publish field, enter a URL built like this:
https://<server>:<port>/any/rest/signature/webhook/json/docusign
The DocuSign servers must be able to reach this URL, so make sure this URL is reachable from outside your network.
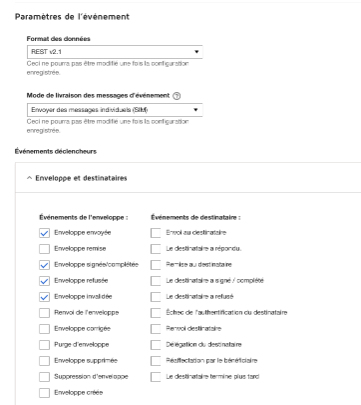
In the Trigger Events / Envelope and Recipients part, tick the following values:
- Envelope Sent
- Envelope Signed/Completed
- Envelope Declined
- Envelope Voided
- Recipient Sent
- Recipient Delivered
- Recipient Signed/Completed
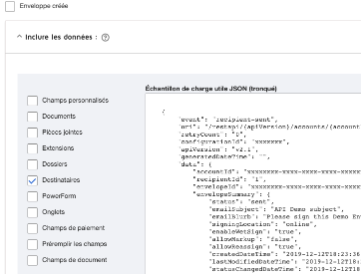
In the Trigger Events / Envelope and Recipients / Include Data part, tick the Recipients value.
Server access configuration
API access
Access URL: this must be https://account.docusign.com or https://account-d.docusign.com for the demo environments.
Purpose: DocuSign
Authorization scheme: Bearer
Token: enter the API Key generated in the Docusign - DocuSign Token paragraph
In the JWT section, tick Enable JSON Web Token.
In the Claims field, enter a JSON made of the values retrieved in the Docusign - APPS and Keys chapter.
{
"iss": "<Integration Key>",
"sub": "<User ID>",
"scope": "signature impersonation"
}
The payload of the token is a "name:value" JSON made of predefined claims (iss, exp, sub, aud, nbf, iat, jti), public or private.
The iat and exp fields are added automatically.
Claims:
{
"iss": "8xxxxxxx-xxxx-xxxx-xxxx-xxxxxxxxfd28",
"sub": "5xxxxxxx-xxxx-xxxx-xxxx-xxxxxxxx7f92",
"scope": "signature impersonation"
}
Save the new module. Saving generates a private key/public key pair that must be used in the DocuSign settings.
Click Copy public key to clipboard.
DocuSign – RSA Key
Go back to the DocuSign account, go to Settings, then to the Apps and Keys section and edit the application created earlier in the Docusign - APPS and Keys chapter.
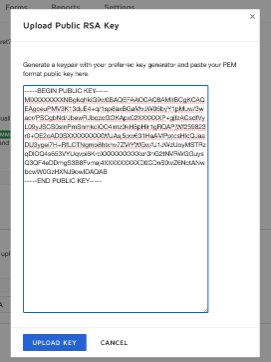
Click the Add RSA Keypair button, paste the public key retrieved in the previous chapter and click Add Key.
DocuSign – Users
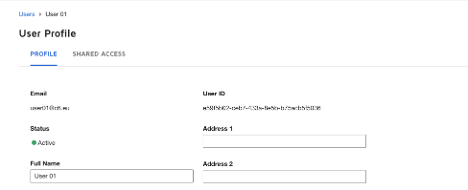
To work correctly, the Any users who must sign must also be created in DocuSign.
The users must have the same email address in Any and in DocuSign.
Configuration in Any
Configure a DocuSign type signature in the Signatures module, selecting the server access created above:
- Signature step:
- One-Time-Password: reception of the code by SMS, or no reception.
- Signature locations:
- Anchors into content: this signature provider uses anchors to place signatures in the content. The native content must have anchors, or an automated signature page must be used through the Content transformations module. The anchor format to add to the native content is
{{s[1..n]}}for signatory 1 to n (for instance:{{s1}}, {{s2}}, etc.). With the automated signature page, the minimum number of signature placeholders can be defined. By default, this number matches exactly the number of signatories at the launch.- Placed by signer: the signature is placed by the signer.
- Anchors into content: this signature provider uses anchors to place signatures in the content. The native content must have anchors, or an automated signature page must be used through the Content transformations module. The anchor format to add to the native content is
- Options for manual signature:
- Allow manual signature: signature triggered by a menu on a document or a set of documents, rather than by a workflow. The selected documents must share the same signature configuration.
- The recipient is the user requesting signature: the content is sent to DocuSign for signature for the signed-in user.
- Recipients are defined as follows: the content is sent to DocuSign for signature for the user defined as follows.
- Allow recipients modification: the initiator can adjust the list before the send.
- Allow external mail recipients: allows external mail for the recipients.
- Available recipients: recipients available for the signature (users or groups).
- Default selected recipients: default recipients for the signature (users or groups).
- Validity period: validity period in days (5 by default).
- Signature completion condition:
- All recipients must sign.
- All recipients must sign one after the other in the specified order.
- External workflow name: name of the wanted workflow in DocuSign. To insert a metadata of the document in the name, use a wildcard:
${<aspect>.<metadata>}: for instance, to insert the name of the document:${core.name}.
Then configure the Send content for signature flow, which determines which signature module applies and to which content.